Example of a tintype presented in a case.
When were they introduced? They were patented by Hamilton L. Smith of Gambier, Ohio in 1856 and quickly became a popular photographic format. Early tintypes were often presented in cases to resemble the more fragile daguerreotypes and ambrotypes. While daguerreotypes and ambrotypes needed the protection provided by cases, tintypes were far more durable. 
Example of a later tintype from the 1890s
How long were they made? They became popular during the Civil War because they were cheaper and lighter weight than daguerreotypes and ambrotypes. Though most popular in the 1850s and 1860s, tintypes could still be purchased in the U.S. as late as the 1930s, particularly in touristy places like amusement parks and fairs.
Why are they called tintypes? The name is a misnomer because tin was not actually used to make them. The photographs were developed directly on thin iron plates lacquered black or chocolate brown. Sometimes they are referred to as ferrotypes or melainotypes instead.
How can you identify them? Tintypes have a dull, flat finish. Photographers often hand colored the images to give them a livelier appearance. It can be difficult to distinguish cased tintypes from ambrotypes because their surface is also dull and flat. The way to distinguish cased tintypes from ambrotypes is to see if a magnet will stick to the back of the case.

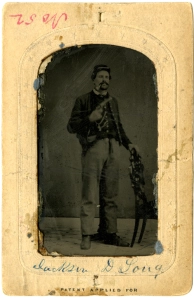
Example of a tintype presented in an embossed paper mat.
Tintypes in paper mats, or no enclosures, were more common than cased tintypes. They vary in size from the samllest Gem size, which measures approximately ½ x 1 inches, to the largest full plate size, that is approximately 8 ½ x 6 ½ inches. The most common sizes for tintypes were sixth plate, measuring approximately 2 ¾ x 3 ¼ inches, and quarter plate, measuring approximately 3 ¼ x 4 ¼ inches. How should they be stored? When handling tintypes it is a good idea to wear cotton or latex gloves to protect the metal plates and photograph emulsion from fingerprints. If your tintypes are in cases, it is possible to remove them but it is not necessary. The cases are providing protection from dust, light and pollutants. The front covers of cases often separate from the backs of the cases and clasps frequently break. To hold the cases together you can wrap them with acid free tissue paper and tie them with string. One exception to the rule of not removing a tintype from a case would be if the glass in the case was broken. Tintypes that are not in cases should be stored in individual enclosures. Paper enclosures should be acid free. Plastic sleeves should be polyester based plastic. When choosing enclosures look closely at the photographic emulsion on your plates. If the emulsion is scratched or flaking, a paper envelope is a better choice. Plastic sleeves may pull the loose emulsion away from the plates. If additional support is needed, you can place an acid free board in paper envelopes or plastic sleeves with the tintypes. If you want to store tintypes in an album, choose a pocket style album that you can easily take the plates out of. Attaching tintypes to album pages with tape or adhesives is not recommended. If you have information, such as names and dates, to record about the tintypes write this information on the enclosures or the album pages. Adhesive labels attached to the back of plates are likely to loose their stickiness over time and fall off. For long term storage they should be in a dark, dry place with low humidity and consistent temperatures.

Example of dented tintype with damaged emulsion.
What are common problems? The iron plates are thin and susceptible to denting and rusting. The photographic emulsion can crack and come loose. Do NOT try to flatten dents in the plates. This may crack the emulsion of the photograph. If they appear dirty, do not wash them. Water can rust the metal and wash away any of the photographic emulsion that is loose. If the emulsion is not chipping or flaking, you can dust them lightly with a soft brush.